The Sitecore Experience Platform (XP) is a popular and powerful Content Management System (CMS) used by many organizations. The digital experience software comes in various configurations based on the enterprises requirements. In this post we will see how we can provision a brand new Sitecore environment on Azure PaaS using Azure Pipelines.
For the sake of simplicity we will deploy the Sitecore v9.0.2 XMSingle (XM0) package which runs both Content Delivery and Content Management roles as a single App Service instance. The deployed XM0 topology on Azure PaaS looks as below.
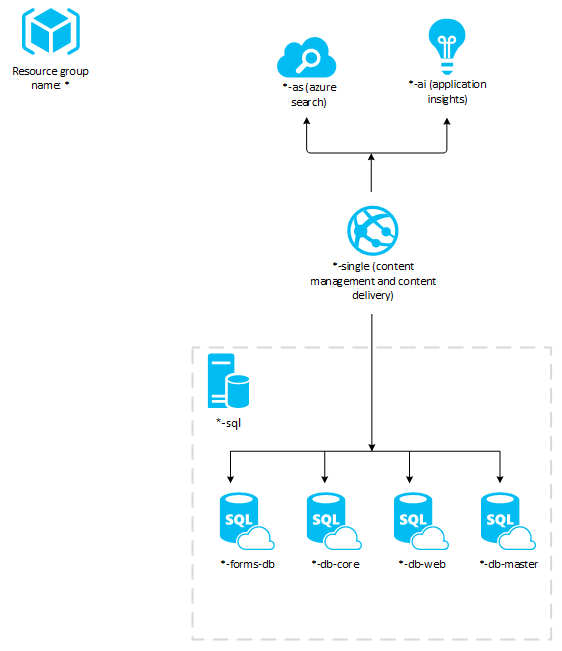
As you can see it contains a single Azure App Service and a SQL Server. It also contains Application Insights and Azure Search resources. All the resources get deployed to a single resource group on Azure.
There is already guide on Sitecore documentation site on how to deploy to Azure PaaS using Powershell. While useful, but it requires lot of manual steps to be performed. This post takes the same approach but uses Azure Pipelines to do much of the work.
By the end of this post we would have Automated provisioning of new Sitecore XM environment on Azure PaaS using Azure DevOps.
Prerequisites
Following are the necessary components for the provisioning the Sitecore environment.
- Sitecore Azure Toolkit - contains the Powershell commandlets and resources necessary to deploy Sitecore to Microsoft Azure App Service. 1
- Sitecore Web Deploy Packages (WDPs) - contains the web application code. 1
- ARM Templates - These can be downloaded from GitHub repository, either by cloning or downloading the source from releases. I recommend downloading them from latest releases. Further, because we will be deploying v9.0.2 of XMSingle I downloaded ARM templates available here and committed in to the source repository.
1
- These can be downloaded only by Sitecore certified developers.
Upload Sitecore packages to Azure Storage account
Because Sitecore Azure Toolkit and WDPs can be downloaded only by certified Sitecore developers, we decided to keep these packages restricted. For this purpose, I decided to upload them to Azure Storage account rather than keeping in the source repository. This provides few advantages,
- With Azure storage role based access control (RBAC) we can control who can access or modify the contents.
- As you will see, this also allows us to update the WDP packages when newer version of Sitecore is available, without changing much in our Azure pipeline.
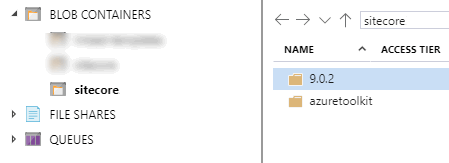
So go to Azure Portal and create a storage account. Once done, I created Blobs like below under a storage container named sitecore. I then used Azure Storage Explorer and uploaded Sitecore Azure Toolkit and WDP files to separate folders as below. Please see I created folder called XMSingle under 9.0.2 folder. This is because, in the future, if for some reason I decided to deploy XP v9.0.2 topology instead of XM, I can upload under the same 9.0.2 folder and keep packages neatly organized.


Commit ARM templates to your source repository
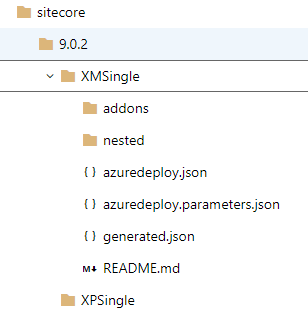
Its time to commit ARM templates downloaded from GitHub repository. I have committed all the ARM templates as below. Please note that it uses linked ARM templates hence you will need to maintain the folder structure. Ensure that you have nested and addons folder in parallel to azuredeploy.json file.
Build pipeline
I will not go in to details of this step, but my build definition basically publishes ARM template (sitecore folder seen above) as part of the Build. I could in the future run few Pester tests to ensure that templates are valid and can consistently be deployed before publishing the artifact.
Release pipeline
My release pipeline has following steps. I will go in detail of all individual steps soon, but here is the summary.
- Purge all resources under resource groups
- Copy the ARM templates to Azure Storage
- Download the Sitecore Azure Toolkit zip file
- Extract the Sitecore Azure Toolkit zip file to agent machine
- Finally, install the Sitecore in the resource group
1. Purge all resources under resource groups
I use Peter Groenewegen’s extension from the VS Marketplace to purge the resource group. This will delete all the resources under a specified resource group.
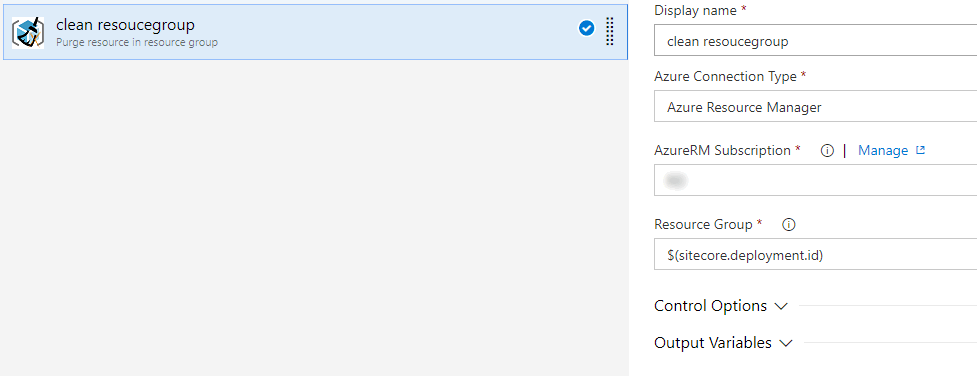
Ideally I wanted to update the resources even if its already present in the resource group. However, if the resource is already present, deployment failed with error
.Net SqlClient Data Provider: Msg 1222, Level 16, State 56, Line 1 Lock request time out period exceeded.
I hence decided to purge the resources before I start the deployment.
2. Copy the ARM templates to Azure Storage
Next we use inbuilt Azure File Copy task to copy ARM templates produced from the build to the storage container.
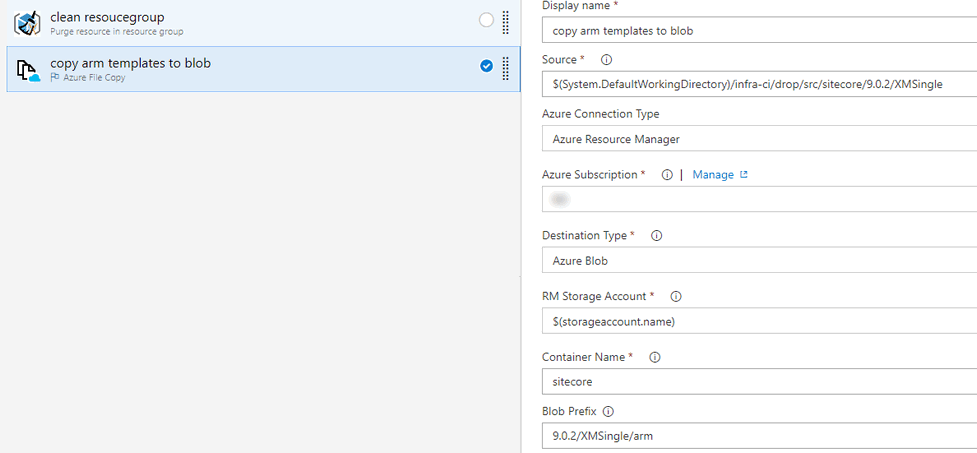
BTW, the blob prefix input (9.0.2/XMSingle/arm) you see in the image will ensures that task copies the arm templates under 9.0.2 folder (as this is the version for ARM templates too)

It is necessary to upload these ARM templates to a location that can be reachable by Azure Resource Manager. I decided to use Azure storage account which is private and accessible only using Shared Access Signature (SAS) token.
The useful thing about Azure File Copy task is, it outputs the storage container URI and storage container’s SAS token to which it uploaded files to. For us, we are are uploading it to the same storage container where our Sitecore packages live. So we will add two variables storageaccount.uri and storageaccount.token. Once this task execution is complete you will have these variables ready to be consumed by other tasks in the pipeline.

Ensure you make storageaccount.token as a secret variable so that the token is exposed NOT exposed in the logs.
3. Download the Sitecore Azure Toolkit zip file
Now the in this step of pipeline we download the Sitecore Azure Toolkit from the storage container we uploaded above. And we will use storageaccount.uri and storageaccount.token variables we created in the above step.
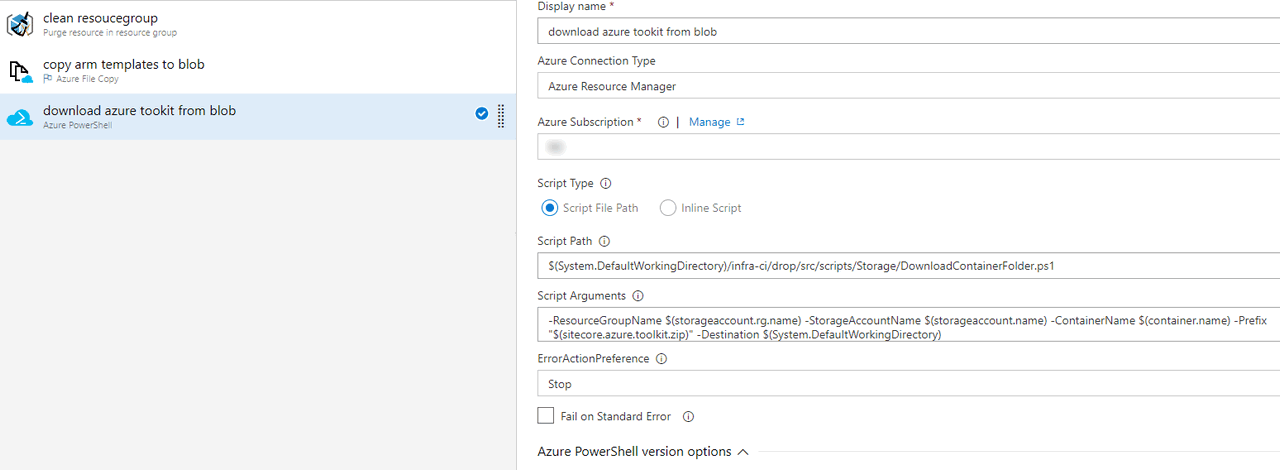
Notice that it is a Azure Powershell task, which automatically handles connection to my Azure subscription. I supply a Powershell script path I wrote, to download the blob (source below) and pass the required parameters to the script. For correctly identifying the blob to download, I need to know resource group name, storage account name, container name, prefix (we mentioned in the Azure File Copy task) and finally the destination folder to which blob will be downloaded to.
I am downloading it to $(System.DefaultWorkingDirectory) which is the default working directory under the running agent. My rest of the variables supplied as parameter to the script are as below.
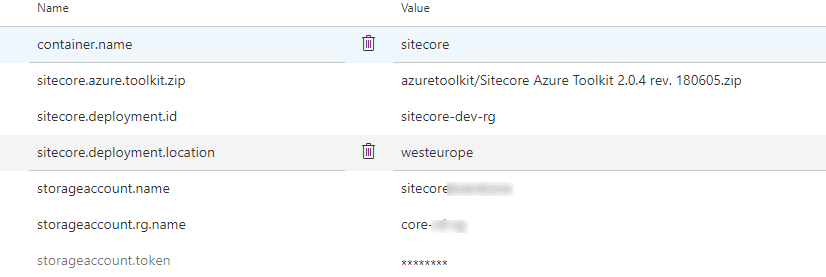
The code below downloads the blob from Azure
[CmdletBinding()]
Param
(
[Parameter(Mandatory = $true)]
[string]$ResourceGroupName,
[Parameter(Mandatory = $true)]
[string]$StorageAccountName,
[Parameter(Mandatory = $true)]
[string]$ContainerName,
[Parameter(Mandatory = $true)]
[string]$Prefix,
[Parameter(Mandatory = $false)]
[string]$Destination = ""
)
try {
Write-Output "Getting the storage account context"
$storageAccount = Get-AzureRmStorageAccount -ResourceGroupName $ResourceGroupName -Name $StorageAccountName
Write-Output "Getting the blob path"
$blobPath = Get-AzureStorageBlob -Container $ContainerName -Context $storageAccount.Context -Prefix $Prefix
if ([string]::IsNullOrWhiteSpace($Destination)) {
$Destination = Get-Location
}
if (!(Test-Path $Destination)) {
New-Item -ItemType Directory -Force -Path $Destination
}
$Destination = Resolve-Path $Destination
Write-Output ("Downloading files to '{0}'" -f $Destination)
foreach ( $item in $blobPath.Name ) {
Write-Output ("Downloading {0}" -f $item)
$result = Get-AzureStorageBlobContent -Blob $item -Container $ContainerName -Context $storageAccount.Context -Destination $Destination -Force
}
Write-Output "Done"
}
catch {
throw $_.Exception.Message
}
By the end of this task, we will have our Sitecore Azure zip downloaded to agent’s working directory which is ready to be consumed by next tasks in the pipeline.
4. Extract the Sitecore Azure Toolkit zip file to agent machine
This task simply extracts the downloaded Sitecore Azure Toolkit zip file. Once extracted, we can start using the powershell module provided in the zip.

5. Install Sitecore
Finally, its time to install Sitecore. The task type is Azure Powershell again. This time we are using inline script and we are doing the following.
- Set all required variables in a hashtable to pass to Sitecore powershell module.
- Import the Sitecore powershell module
- Call the Sitecore installation command from the imported module.
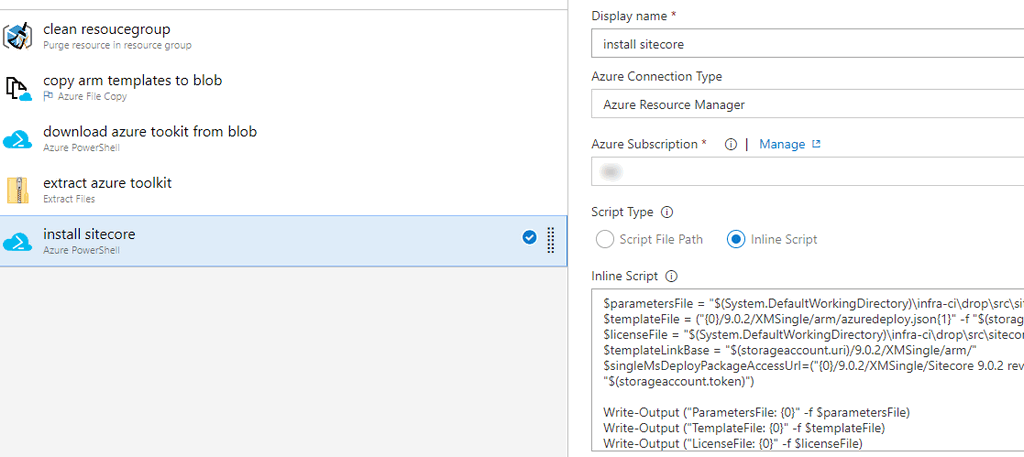
1. Set all required variables in a hashtable to pass to Sitecore powershell module
In this first few lines of the script we set required paths and store them in various variables.
- Set the variable
parametersFileto ARM template parameter file from build artifacts (produced by build as artifact) - Set the variable
templateFileto the main template fileazuredeploy.jsonwhich is the main ARM template (we uploaded it to to storage container in step #2 above) - Store the Sitecore license file location in to
licenseFilevariable (required for Sitecore installation) - Store the blob folder containing our ARM templates in
templateLinkBasevariable. singleMsDeployPackageAccessUrlvariable will hold the location of the Blob which contains the Sitecore XM Single WDP zip file.- Next, we create a hashtable and store all the above created variable as key-value pair and store it in variable named ``parameters`.
- Ensure you have ending
/to the URL intemplateLinkBasevariable. If you do not, you will get an error likeCannot bind argument to parameter 'ArmParametersPath' because it is an empty string.- Notice we add SAS token to
templateFileandsingleMsDeployPackageAccessUrlvariables so that these files are available to the Sitecore powershell module.
The script is as below.
$parametersFile = "$(System.DefaultWorkingDirectory)\infra-ci\drop\src\sitecore\9.0.2\XMSingle\azuredeploy.parameters.json"
$templateFile = ("{0}/9.0.2/XMSingle/arm/azuredeploy.json{1}" -f "$(storageaccount.uri)", "$(storageaccount.token)")
$licenseFile = "$(System.DefaultWorkingDirectory)\infra-ci\drop\src\sitecore\SitecoreLicense.xml"
$templateLinkBase = "$(storageaccount.uri)/9.0.2/XMSingle/arm/"
$singleMsDeployPackageAccessUrl=("{0}/9.0.2/XMSingle/Sitecore 9.0.2 rev. 180604 (Cloud)_single.scwdp.zip{1}" -f "$(storageaccount.uri)", "$(storageaccount.token)")
$parameters = @{
"deploymentId"="$(sitecore.deployment.id)";
"singleMsDeployPackageUrl" = "$singleMsDeployPackageAccessUrl";
"templateLinkBase" = "$templateLinkBase";
"templateLinkAccessToken" = "$(storageaccount.token)" ;
"sqlServerPassword" = "$(sitecore-sqlserver-passwod)";
"sitecoreAdminPassword" = "$(sitecore-admin-password)";
"sqlServerLogin" = "$(sitecore-sqlserver-admin-username)";
}
- The default ARM template parameter file does not contain
templateLinkBaseandtemplateLinkAccessTokenparameters. We pass these additionally inparametersso that Sitecore module + Azure Resource Manager can access nested ARM templates.sqlServerLogin,sqlServerPasswordandsitecoreAdminPasswordare secret variables coming directly from Azure Keyvault. Read more here on how to get this working. This ensures that you maintain all your secrets (not just ones used in the pipeline but all your application secrets as well) in the Keyvault and not in Azure DevOps Pipeline variables.
2. Import the Sitecore powershell module
Next, we just import the Sitecore powershell module from the downloaded Sitecore Azure Toolkit location using the below command.
Import-Module "$(System.DefaultWorkingDirectory)\blob\tools\Sitecore.Cloud.Cmdlets.psm1" -Verbose
3. Call the Sitecore installation command from the imported module
Finally, we call Start-SitecoreAzureDeployment command from Sitecore.Cloud.Cmdlets.psm1 module we imported above. We pass the variables we set above. Notice, we pass our hashtable to SetKeyValue parameter. The Sitecore module passes this value as additional parameters to the ARM template.
Start-SitecoreAzureDeployment `
-Name "$(sitecore.deployment.id)" `
-Location "$(sitecore.deployment.location)" `
-ArmTemplateUrl $templateFile `
-ArmParametersPath $parametersFile `
-LicenseXmlPath $licenseFile `
-SetKeyValue $parameters `
-Verbose
This should start the deployment of a brand new Sitecore XM environment. If all went well, you will have pipeline which enables you to consistently provision a Sitecore environment and a Sitecore environment in Azure PaaS ready to use.
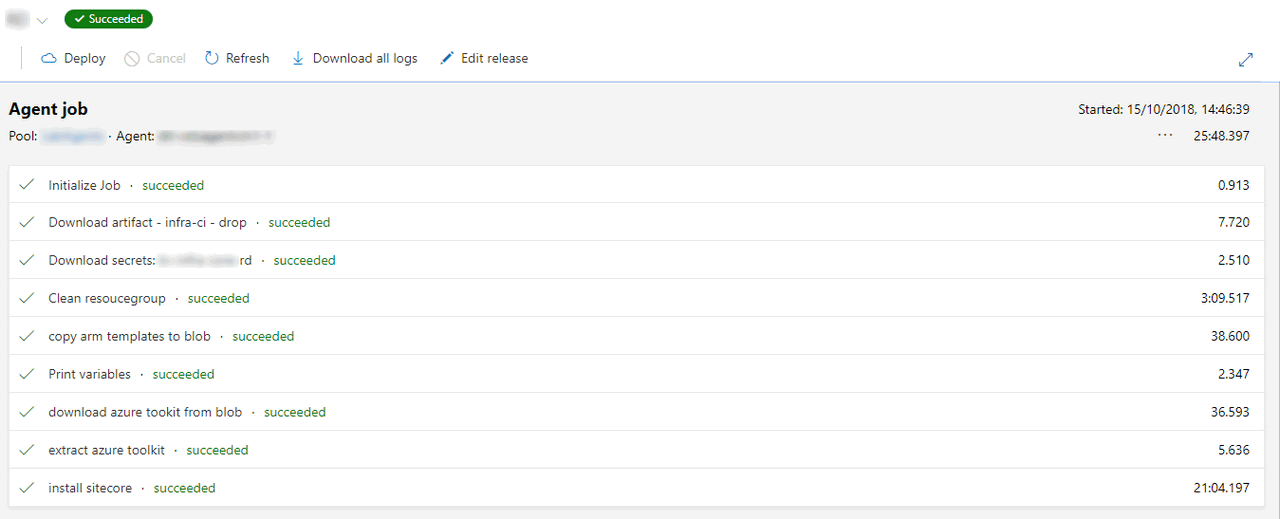
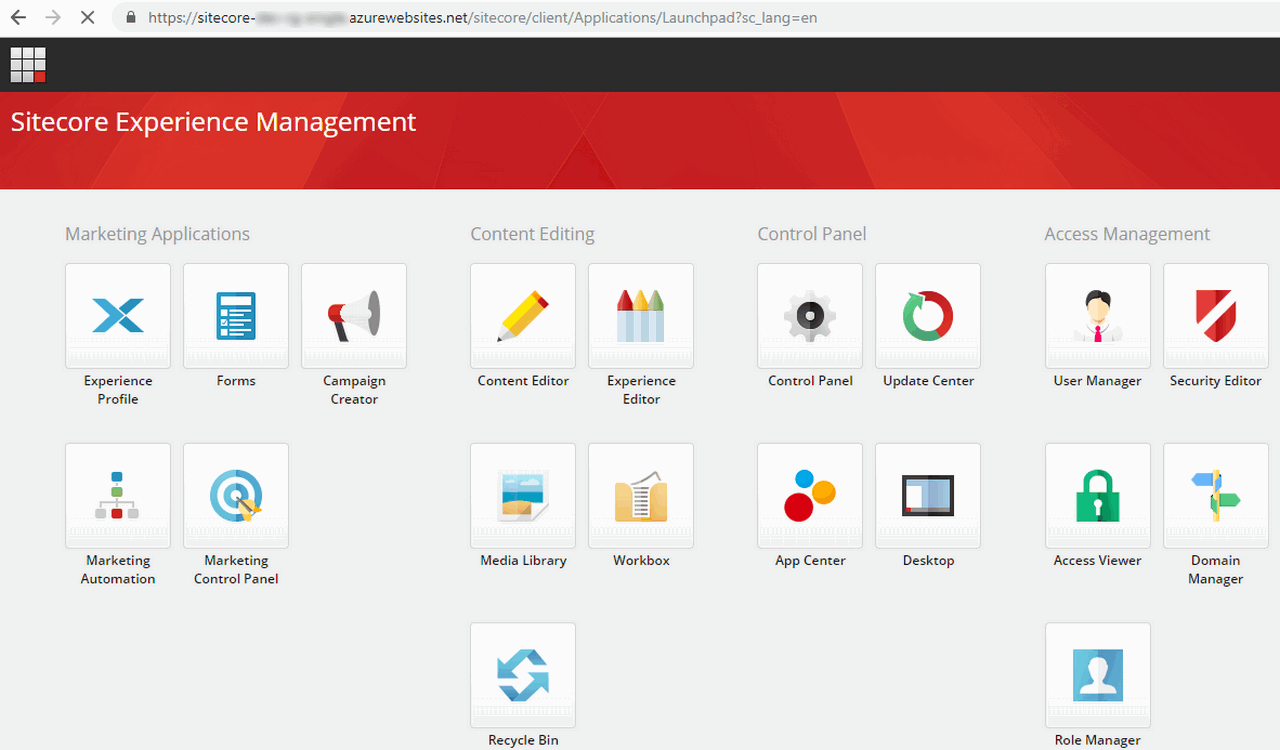
And you can login to your Sitecore Admin dashboard you app service URL, which will be something like <<website>>.azurewebsites.net/sitecore. On successful login, you will see the Admin dashboard.
Conclusion
As you saw, With Azure DevOps Pipelines, you could provision a brand new Sitecore infrastructure on Azure PaaS in less than 30 min. I hope you found this post useful. Please share and leave your feedback. If you have any improvements/suggestions do not hesitate to share.


