Would you consider a 16 character alphanumeric password stored in an excel spreadsheet in a shared location secure? I’ve had the joy of watching infrastructure engineers provision infrastructure in the cloud like they have done on-premise for years - MANUALLY! The concepts of Infrastructure as Code have been around for a while, so have configuration management tools like Chef and Puppet but, both the cost & complexity scares people from adopting either. VSTS on the other hand has a very low entry barrier in both cost & complexity and integrates the Application Lifecycle Management into DevOps in a way which doubles the value provided by the automation pipelines. In this blogpost I’ll take you the full 9 yards with a walk through on how to set up an infrastructure deployment pipeline using VSTS …
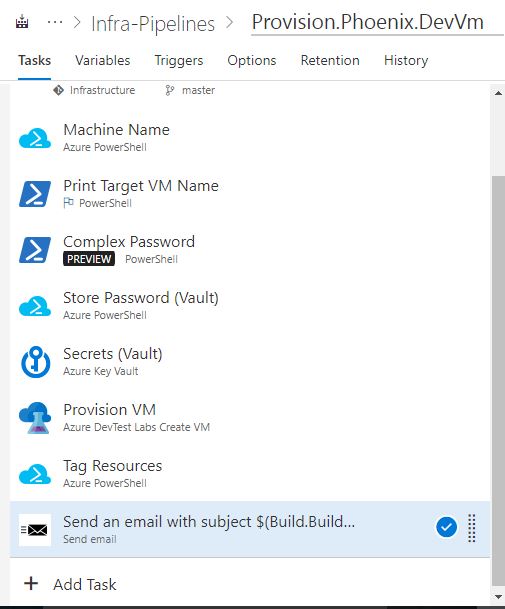
- Machine Name
- Generate a strong Password
- Store the secrets in Azure KeyVault
- Read secrets from Azure KeyVault
- Provision a new Virtual Machine in Azure DTL
- Tag Resources in Azure
- Send a summary email with login details
The end product would something like this…
Pre-requisites
- Visual Studio Team Services: If you don’t already have Start off by creating a free instance of Visual Studio Team Services
- Azure Subscription: If you don’t already have an Azure subscription start off my signing up for free here
Integrate Azure & VSTS
Set up Azure as a service endpoint in VSTS
Infrastructure Deployment Pipeline
Read through the elements of the infrastructure pipeline, feel free to directly jump to the element that’s most relevant to you. Also work well together and in isolation. Start off by creating a new Pipeline in Team Services by choosing the Empty Template…
Machine Name
Problem: Enterprises have a naming convention for virtual machines. Infrastructure engineers are most comfortable with looking at the latest machine name and then working out the new machine name manually. They will then block that name in a spreadsheet so they don’t accidentally give that name out to someone else which may lead to conflict.
Let’s automate this… Add the Azure PowerShell task from the library and copy the below code into the task… The snippet below queries azure for a list of all the virtual machines that have a name similar to the regex pre-fix, then order the list and take the machine with the highest number. Then simply increment the number by 1 to come up with the name of the machine to be provisioned.
$rgName = '*AZU-WIN-DV1-*'
$prefix = 'AZU-WIN-DV1'
$seqNo = 000
$lastVm = Get-AzureRmVM | Where-Object Name -Like $rgName | Sort-Object Name -Descending | Select-Object -First(1) Name

if($lastVm.Name -match "\d"){
    write-host "Seq no exists!"
    write-host "Last VM: $($lastVm.Name)"
    $seqNo = [int]($lastVm.Name.Split('-')[3])
}

$newNo = $seqNo + 001
$uniqueMcName = "$($prefix)-$newNo"
The PowerShell variable $unqiueMcName has the value of the new virtual machine. In order to use this value else where in the pipeline, it’s best to store this in a variable in the build pipeline. You can do that by creating a new variable AzureTargetVmName in the build and then updating it’s value by appending the below in the snippet above…
Write-Output ("##vso[task.setvariable variable=AzureTargetVmName;]$($uniqueMcName)")
Strong Password
Problem: How often have you seen people use a standard username and password as the local administrator account on the machine when provisioning vm’s in the cloud. If the password is compromised, you’ve literally opened up all virtual machines that share the same password out for access.
Let’s automate this, PowerShell gives you a very handy method to generate a password, what’s even better is you can specify the number of alpha numeric characters to be used in the generation. See the code snippet below…
[Reflection.Assembly]::LoadWithPartialName("System.Web")
$pwd = [System.Web.Security.Membership]::GeneratePassword(16,4)

Write-Output ("##vso[task.setvariable variable=AzuVmPassword;]$($pwd)")
To access the method GeneratePassword you need to partially load System.Web, the method allows you to specify the length of the password and the second parameter into this method allows you to specify the number of alphanumeric characters to be used. In the last line in this snippet, I am assigning the password to a secure pre-defined variable so it can be securely used in subsequent tasks in the pipelines.
Store Secret in KeyVault
Problem: You have a secure password, but it ain’t secure till you store it securely. Unfortunately many people still rely on spreadsheets as a secure store for passwords. Some people choose to store them in password stores, which is step in the right direction, however if your password store doesn’t expose an API, you’ll still have to hand handle password, which opens it up to a risk of exposure.
Let’s address this issue using Azure KeyVault and automate it’s workflow by creating a task for it in the infrastructure deployment pipeline. VSTS has already got a task for Azure PowerShell script, that allows you to connect to your Azure subscription using a SPN and makes all relevant Azure PowerShell modules available without you having to add these urselves. We’ll make use of this task and make a call to the Azure KeyVault to store the password as a secret.
You can follow the steps here to create a new Azure Key Vault, remember to add the Visual Studio SPN account as a principle into your Key Vault, so it has permissions to add, read and modify keys. Azure also has an analytics service for Key Vault, so you can also track which keys are being used and learn so much just from the usage trends of this data.
# Create a key name
$key = ($env:AzureTargetVmName)
$key += "-LocalMachineAdministrator"

# Save the secret in the keyVault
Set-AzureKeyVaultSecret -VaultName 'Aim-Dtl-KeyVault-01' -Name $key -SecretValue (ConvertTo-SecureString -String $env:AzuVmPassword -AsPlainText -Force)
As you can see in the script above, I am generating a key name for the secret which I am calling as Name of the machine-Local Machine Administrator, then simply calling the Set-AzureKeyVaultSecret with the name of the vault, the name for the secret and the encrypted password. KeyVault also allows you to pass other parameters such as ActivationDate and ExpirationDate, these are other options you can put to use to further secure the secrets stored in the KeyVault.

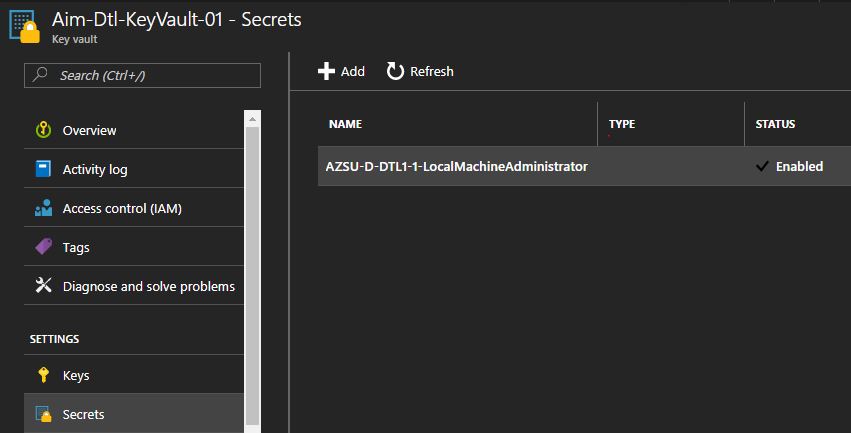
As you can see the value is now reflecting in the Azure Key Vault secrets…
Read Secrets from Azure Key Vault
Problem: If you are building a modern application and are following modern design principles, there is a good chance your infrastructure is composed of a number of layers and services that have their unique set of keys and secret. While it’s possible to store these values directly as variables in a build definition, this is hard to scale as you’ll need to add these secure variables in every build definition and then managing the lifecycle of the updates values across multiple builds is equally tedious.
In the last step we saw how easy it is to spin up a new Key Vault in Azure and store password in it, you can extend the use of the Key Vault by using other secrets and keys in the store. In this step we’ll look at how easy it is to access the keys and secrets in Azure Key Vault directly from the build pipeline in VSTS and consume these values. What’s great about this approach now that the Key Vault is the master repository of these secrets and the API’s allow it consumption by systems that you authorize the use for…

You have an option for reading all values, or add the exact key name in a comma separated format to only read selected keys.
Provision a new Machine using VSTS
Visual Studio Team Services integrates with Azure better than almost any other tool other there. Azure V2 uses resource manager, you can create an ARM (Azure Resource Manager) template to create a resource within Azure. What’s great is that VSTS allows you to invoke the deployment of these ARM templates right from within a pipeline, this means you can dynamically pass parameters which by the way could be generated by earlier tasks in the pipeline. What’s even cooler is that you can then pass back the name of the resource/vm into a variable in your pipelines, which can be used by subsequent tasks to deploy software and execute tests, the options are limitless…
Microsoft runs an open source repository of ARM templates on GitHub by the name of Azure Quick Start Templates, with over 2500 followers and 3000 forks, this is a very vibrant repository, possibly all you in for converting your infrastructure to code… I’m going to use the basic ARM template example I’ve created a walkthrough for in the following blogpost. You are welcome to use this or bring your own…
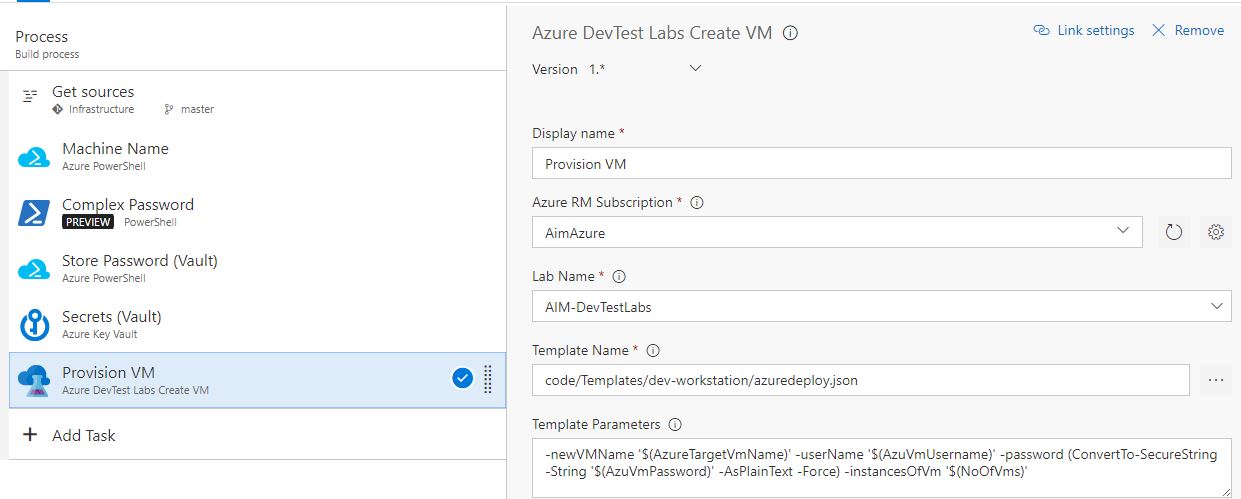
You can add some variables to show up at the time of queue, so the user can optionally change their values. Like in this case, the instances of VM’s to be deployed are shown up as an input parameter, defaulted to 2 but the user can change this. I’ve changed this value to 5…
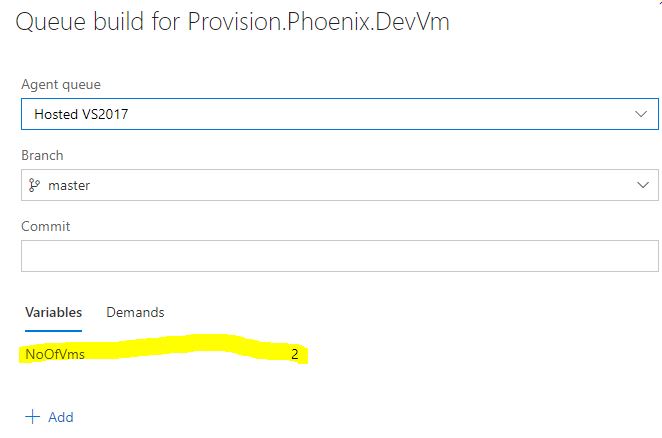
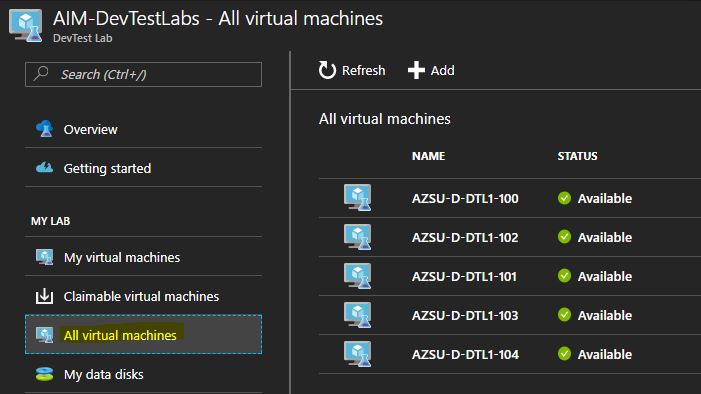
When the build is run, the vm’s are provisioned in Azure…
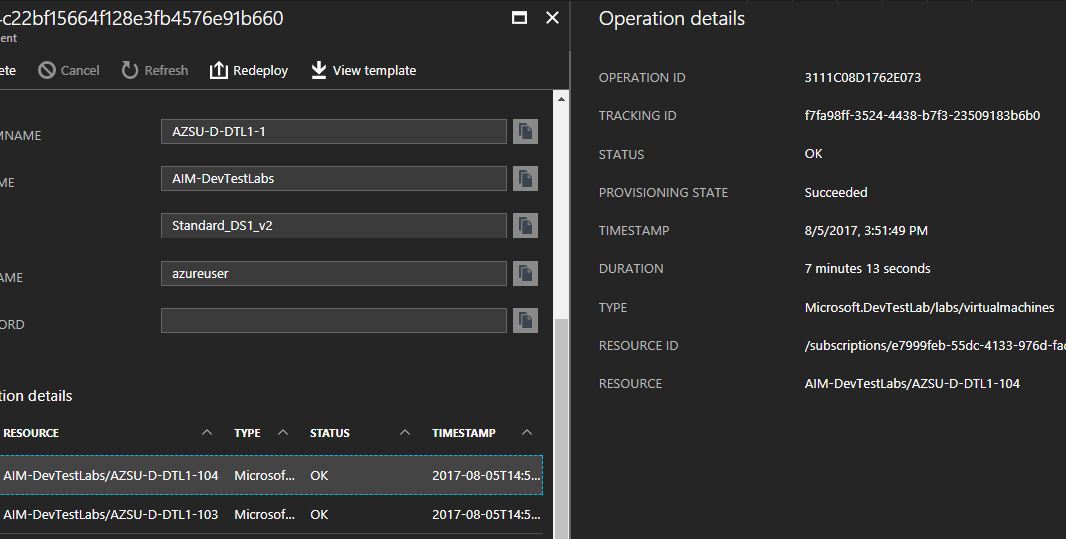
Those that fear magic… You can actually track the full deployment and provisioning of these resources in Azure by looking at the deployment right from within the Portal…
Tag resources in Azure
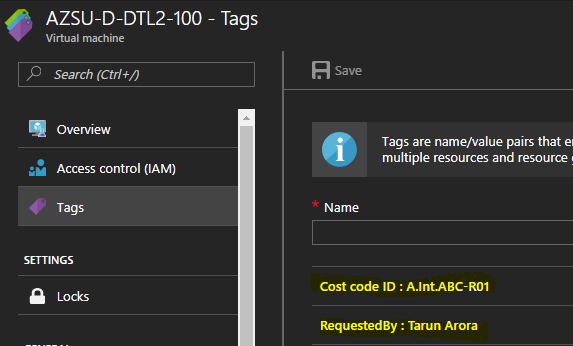
Tagging provides you a way to add key value pairs to any resource in Azure. You could use these key value pairs to search for these resource, pin these resources or track the cost for these resources. The tags show against the resource in the invoice as well, this gives you a nice way to track the spend per resource. I’ve often seen enterprises use this as a mechanism for tracking who requested the resource, what ITIL system request was it provisioned under and what cost code will the resource spend be charged back to…
Considering tags are used in such a meaningful way, why not set them at source through this pipeline in an automated way, rather than worrying about it later. In the code snippet below, I am using the Azure PowerShell task again to update the tags on the machines provisioned through this pipeline.
$vmName = $env:AzureTargetVmName
$items = Find-AzureRmResource -ResourceGroupName $vmName

foreach($i in $items)
{
    $i.Tags += @{"Cost code ID"="A.Int.ABC-R01"}
    $i.Tags += @{"RequestedBy"="Tarun Arora"}
    Set-AzureRmResource -Tags $i.Tags -ResourceId $i.ResourceId -Force
}
Summary Email
Last but not the least, an email notification to inform your users that the infrastructure provisioning process has completed. The Send Email task in the marketplace gives you a way of using your own SMTP server to send email notifications, it allows attachments in email as well. So, if you wanted to email your users some stuff at the end of the pipeline along with some instructions or output from the machines being provisioned then this task makes it possible. In the example below, you can see I am using this task to first generate a summary of the software that’s installed on the target machine and then attaching that to the email that gets send out.
$name = hostname
$text = $name
$text | Set-Content 'SoftwareSummary.txt'

$text = Get-ItemProperty HKLM:\Software\Wow6432Node\Microsoft\Windows\CurrentVersion\Uninstall\* | Select-Object DisplayName, DisplayVersion, Publisher
$text | Add-Content 'SoftwareSummary.txt'
This file gets generated in the location $(Agent.ReleaseDirectory)\SoftwareSummary.txt. I can use the Send email task now to attach this file directly in the email being send out, see the reference screen shot below…

What do you think? Useful? Any more ideas on how this could be expanded out further, feel free to leave a comment…
Tarun


